

Introduction to the Thermaltake 200 case
Building your dream gaming rig can be an exhilarating journey, especially when it comes to carefully selecting the right components. If you’re gearing up for a powerful setup, the Gigabyte b650 gaming x ax v2 fit in Thermaltake 200 is likely on your radar. This robust board promises exceptional performance and features that cater to gamers and creators alike.
But before you dive into assembly mode, there’s one crucial detail to nail down: compatibility with your case. Enter the Thermaltake 200 – a sleek chassis designed not only for aesthetics but also for functionality. You want everything to fit perfectly without compromising airflow or cable management.
Ready to explore how the Gigabyte B650 Gaming X AX V2 fits snugly into the Thermaltake 200? Let’s get started on this exciting adventure!
Overview of the Gigabyte B650 Gaming X AX V2 motherboard
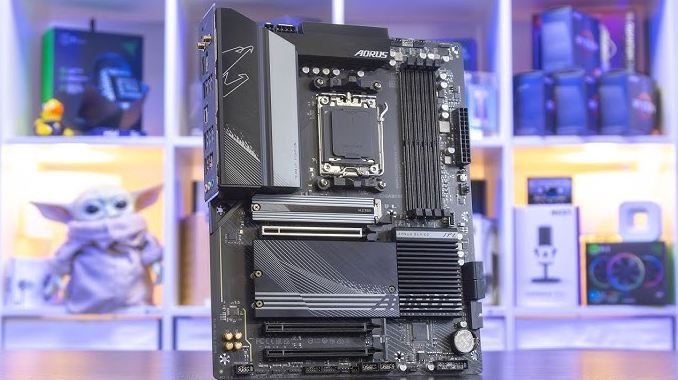
The Gigabyte B650 Gaming X AX V2 motherboard is designed for gamers seeking performance and versatility. It supports the latest AMD Ryzen processors, ensuring compatibility with cutting-edge technology.
This motherboard features a robust power delivery system. Enhanced thermal design keeps components cool during intense gaming sessions. With PCIe 5.0 support, it allows for rapid data transfer rates.
Connectivity options are plentiful here. USB 3.2 Gen 2 ports offer high-speed connections for peripherals, while integrated Wi-Fi ensures seamless online gameplay without lag.
The sleek aesthetic includes customizable RGB lighting, adding flair to any build. Its user-friendly BIOS interface simplifies overclocking and tuning settings.
With expandable slots for additional RAM and storage drives, this board caters to future upgrades too. It’s a solid choice for anyone looking to elevate their gaming experience with durability and speed at its core.
Compatibility of the two components
The compatibility between the Gigabyte B650 Gaming X AX V2 motherboard and the Thermaltake 200 case is crucial for a successful build.
First, let’s look at dimensions. The Thermaltake 200 supports ATX motherboards, while the B650 falls into that category.
Next, consider mounting points. The pre-drilled holes in the case align perfectly with those on the motherboard. This ensures a straightforward installation process without any extra adjustments.
Airflow is another factor to keep in mind. Both components are designed with cooling in mind, so they complement each other well when installed correctly.
Check I/O shield compatibility. The Gigabyte board comes with an integrated I/O shield that fits seamlessly within the cutout of the Thermaltake case—no need for additional modifications here!
Step-by-step guide on how to fit the motherboard into the case
Start by preparing your workspace. Clear off any clutter and gather all necessary tools, including a screwdriver and anti-static wrist strap.
Next, remove the side panels of your Thermaltake 200 case. This will give you ample room to work. Lay the case flat for better access.
Now, locate the standoffs inside the case. These are crucial for mounting your Gigabyte B650 Gaming X AX V2 securely. Ensure they’re positioned correctly according to the motherboard’s layout.
Carefully align the motherboard with these standoffs. Make sure that ports fit through the I/O shield at the back of the case.
Once aligned, gently press down until it sits snugly on top of each standoff. Use screws provided with your motherboard to secure it in place.
Double-check connections before moving forward; this ensures everything is properly seated and ready for power!
Tips for proper cable management and airflow
Proper cable management is crucial for a clean build. Start by using zip ties or Velcro straps to bundle cables together. This minimizes clutter and makes your case look tidy.
Routing cables behind the motherboard tray can free up space in the main chamber. Most cases, including the Thermaltake 200, have cutouts designed for this purpose.
Pay attention to airflow as well. Keep power supply cables away from fans and ventilation areas to prevent obstruction.
Consider using modular power supplies that allow you to connect only necessary cables. It reduces excess wiring inside the case.
Regularly check dust filters and vents; they play a significant role in maintaining optimal performance over time. A little routine maintenance can go a long way in ensuring longevity and stability of your components.
Additional components and upgrades for optimal performance
To maximize the performance of your setup with the Gigabyte B650 Gaming X AX V2 and Thermaltake 200 case, consider adding high-quality RAM. Opt for speeds above 3200 MHz for a noticeable boost in multitasking and gaming.
Upgrading your GPU is another impactful step. A powerful graphics card will enhance visual fidelity and frame rates, especially if you’re into gaming or graphic-intensive tasks.
Storage solutions also play a crucial role. Consider NVMe SSDs for faster load times compared to traditional HDDs. They can significantly improve system responsiveness.
Investing in quality cooling solutions is vital. Adding extra case fans or an aftermarket CPU cooler can keep temperatures down during heavy loads, ensuring stable performance over time.
Conclusion
Fitting the gigabyte b650 gaming x ax v2 fit in thermaltake 200 case is entirely feasible with careful planning and execution. The compatibility between these components allows for an efficient setup, enabling you to harness the full potential of your gaming rig.
By following our step-by-step guide, you can ensure that everything aligns perfectly without any unnecessary hassles. Proper cable management will not only enhance the aesthetics but also improve airflow within your case, keeping temperatures in check during intense gaming sessions.
As you upgrade and add additional components for optimal performance, remember to keep both space and cooling in mind. Each component plays a crucial role in enhancing overall gameplay experience.
With attention to detail and some patience, setting up your system can be a rewarding endeavor. Enjoy diving into the world of gaming with confidence knowing you’ve built it right.